Catalytic heater install (Wave6)
WARNING
The below describes how our new catalytic heater was installed. Nothing shown or described is intended to recommend to anyone they should buy or install a catalytic heater, nor have one installed for them. There are explicit risks inherent with a fuel-burning device in a living space, especially a small living space. Anyone using a fuel-burning appliance, including but not limited to a catalytic heater, MUST follow all manufacturer's recommendations for the installation, use, and care of the appliance, including all ventilation requirements for this appliance.
Installation Details and Notes
She heater is open and the positioning rod holds it in any of ten fixed positions. Another picture displays how the top bracket is applied. This picture shows a full-length piano hinge attached with #6X3/4" flat head wood screws to the wood cabinet stile. The hinge is pop-riveted to the white aluminum sheet. The aluminum sheet is two 1/16" X 18" X 18" lightweight signs (used) cut down with a fine-blade jig saw. The black thing is a bumper to stop the heater and hanger when it is swung back to storage position against the cabinet. The heater is attached with 4 ea 1/4-20 X 1" hex bolts to the aluminum sheet -- I suggest installing jack-nut fasteners into the heater's rear mounting holes and thread the bolts into them. Notice the curved cut-out at the bottom corner of the white sheet? That is to clear the furnace duct outlet on the cabinet near the fire extinguisher.

This top view shows the added bracket to allow fixing the heater's radiating position, so it follows Debbie wherever she sits. The metal rod is cut from a screen door turn-buckle assembly, it is one of the two rods. I hand-bent the right angle to drop into the position holes, and used the flattened other end to attach to a small L-screw on the cabinet's side. You can see ten holes in the 1/8" X 1" X 14" aluminum stock, and two attachment screwheads. Plus there is one more hole in the heater housing at the left end of the picture -- that is where the positioning rod pins the heater into the closed position for driving days. Note also the warning decal on the heater housing's top. Follow the manufacturer's warnings and instructions.

The large L-bracket is the bottom of two for storing the heater on driving days. The upper one is far smaller because it is not weight-bearing, and it has a hole in it to allow pinning the heater in place with the positioning rod. See the rubber grommet at the left side of the bracket? That covers the original propane house route through the cabinet, when we used the heater portably on oem feet. Then we decided to wall-mount the heater to take less floor space.

This shows the upper L-bracket and the positioning rod inserted to fix the heater for driving days.The rod goes through the bracket and into the heater housing.

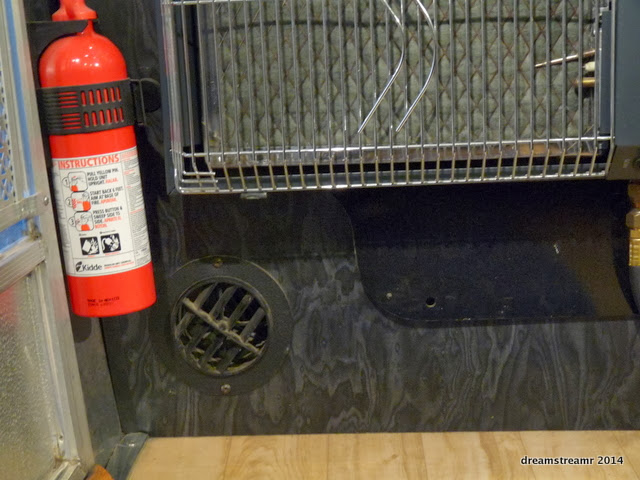
This shows the clearance between the fire extinguisher, the duct outlet, and the installed heater.
Additional NOTES:
We keep the heater covered when not in use. This helps prevent premature contamination of the catalyst pad. The cover has a decent vinyl cover with elastic edges, reduces dust accumulation into the catalyst pad. Our Wave6 heater is over eight years old and going strong still.
QUESTIONS:
Did you drill new holes in the unit to attach your pin bar? Would that hurt it or is there anything you could hurt by drilling into the casing? The heater housing had no holes on this edge. I used a stop collar to prevent the drill pit from pulling in further than necessary.
How does the lower L-bracket function, I don't see a pin to help? The lower L bracket is a rest to support the end of the heater while bouncing down the highway. The curb side of a trailer gets more knocks than the street side because pavement is often in worse condition at curb side. The heater's other end is supported by the hinge.
Do you think using wood instead of the alum sheeting would be OK, is it a heat thing? or just weight and space preference? You investigate the manufacturer's clearance requirements for the back of the heater. The aluminum will hold up better, is not combustible, is lighter weight than 3/8" or greater plywood, forms more secure attachments to the hinge (I used rivets), is easy to work, holds paint well (powder coat white on back, spray painted black on facing side). It's held up for over 100,000 miles of bouncing on Canada's and the USA's best bumps without issue.
Can the unit swing all the way back to point towards the rear, in case Deb wanted to go to the back of the coach!? My heater will swing 160 degrees only. I did not extend the hinge the additional 2" past the cabinet stile to allow the heater to clear to 180 degrees without hitting the oven door. You could easily mount it so it would swing 180.
Where should I put my RAM vent to get enough air over to the heater as an intake path? My first choice was to install the intake vent under the heater. Instead, the vent is on the other side of the trailer door from the heater, low (approx 12" o.c. above the floor level) in the curb side wall adjacent to the sofa. This sometimes results in a little bit of draft at our ankles if we are sitting near the curbside. I wanted to create a source of replenishment for the humans to breathe, help vent the moisture, and wanted to reduce the draft we formerly felt from opening a nearby window. This arrangement seems to have achieved the goals.
[Edited 20140115; 20171215]
© dreamstreamr.com 2007-2019